Dual battery install secrets
8th May 2025 | 6 minutes to read
Ever wondered what dual battery setup Graham runs in his D-MAX? Graham reveals the simple yet innovative system he uses, plus how you can install the same setup in your 4WD.
This guide walks you through how to install a dual battery system at home, making it easy to head out bush for weeks with all the power and 12v requirements you’ll ever need.
Find out about Graham's installation below:
Graham’s 12V Dual Battery System
In all of Graham’s 4WDs, he runs the CTEK D250SE and has done so for years. This DC-DC charger supports both AGM and Lithium 12v batteries, making it suitable for nearly any setup.

What You Need
Here’s a list of everything you’ll need to install the system:
- Red and black cables
- Heat shrink
- Terminals
- 2 fuses or circuit breakers
- Wire cutters
- Wire strippers
- Crimping tool
- Allen key (for tightening the CTEK terminal points)
- Corrugated tubing

How Everything is Connected
Before installing the CTEK system in the D-MAX, we laid out the system on a table to show how everything connects.
The CTEK D250SE performs better when it’s closer to your secondary battery. The longer the cable between the charger and the second battery, the greater the voltage drop.
Here’s how to connect everything:
- Run a red (positive) cable from your starter battery to a circuit breaker (we used a 60-amp circuit breaker), then connect it to the bottom-left input terminal of the D250SE.
- Run a red (positive) cable from the bottom-right output terminal of the D250SE to another circuit breaker, then to the positive terminal of your secondary battery.
- Run a black (negative) cable from the top-right output terminal of the D250SE to the negative terminal of your secondary battery.
- Run a black (negative) cable from your secondary battery to either a chassis earth point or the negative terminal of your starter battery.
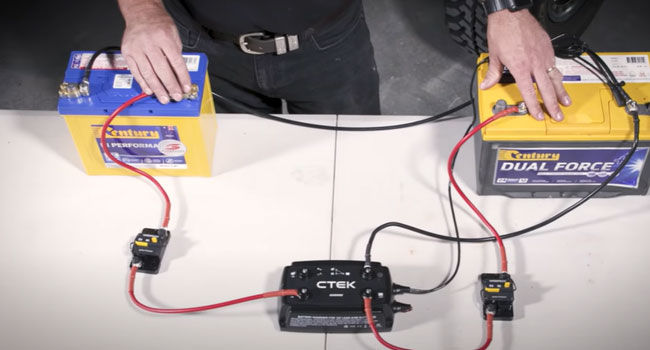
Make sure to terminate your cables properly using the correct crimping tool for the cable size. Heat shrink is essential for safety and waterproofing your cables.
This is the basic circuit layout for your 4WD.
Tips & Advice
Here are a few extra tips to ensure your setup is installed properly.
Performance
To get the best performance out of the system, mount the CTEK unit in a well-ventilated location that stays as cool as possible.
Reduce Failure
A poor earth connection is the most common cause of 12v system failures. Ensure you find a clean chassis earth for all your earth cables.
Cable Sizing
The CTEK manual includes a simple guide to cable and fuse sizing, making it easy to figure out exactly what you need for your setup.
Terminal Tightening
A common mistake is only tightening the D250SE terminals by hand. Use an Allen key to properly tighten the terminals and avoid future issues.
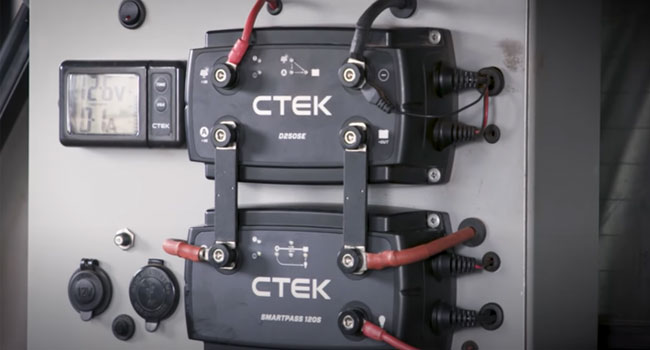
CTEK Smartpass
Graham also runs the CTEK Smartpass 120S alongside the D250SE. This requires a much larger fuse — we installed a 300-amp circuit breaker instead of the 60-amp breaker used for the D250SE.
The Smartpass 120S includes a Battery Guard function, which ensures critical equipment like radios, emergency lights, and navigation systems always have power. It prioritizes these systems when the service battery voltage is low by disconnecting non-critical consumers.
2x Mode Selection Cables
When installing the D250SE, you’ll notice two mode selection cables (red and black).
- For Lithium Batteries: Connect the black cable to a constant live feed. A constant live feed is a wire that always has battery voltage, even when the ignition is off.
- For Smart Alternators: If your vehicle has a smart alternator (like the D-MAX or most modern 4WDs), connect the red cable to the ignition signal (sometimes called D+ or Clamp 15). This triggers the smart alternator function, allowing the charger to power your battery even when the alternator delivers low voltage.
- If not needed: If you don’t need to use one or both mode selection cables, leave the rubber covers on the wires and tuck them neatly to the side of the CTEK unit.

Temperature Sensor
The final step is attaching the temperature sensor, which adjusts the current going to the battery based on its temperature.
Batteries charge best at around 25°C, and the sensor ensures efficient and safe charging.
- Secure the sensor to a clean, flat spot as close to the positive terminal as possible for accurate readings.
The Rundown
Graham’s dual battery setup with the CTEK D250SE is simple, reliable, and perfect for powering all your 12v needs on long trips.
By following these tips and installing the system correctly, you’ll have a setup that keeps your fridge running, devices charged, and lights on — no matter how remote your adventure.


