How to use a jump starter
Abby Wingett | 13th July 2022 | 5 minutes to read
As you rush out the door to get to work, drop the kids at school or get to the shop, nothing comes at a more inconvenient time than a flat battery. Whether your battery is on its last legs, you left the interior light on, or the cold weather has sapped its energy, get the kick you need with a quality battery jump starter.
Modern jumpstarters are simple to use, safe to operate and come in a multitude of sizes to enable effective starting even from the smallest of units. Whether stored at home or in the glove box, you have the peace of mind of getting back on the road without the fuss of calling roadside assistance or messing around with jumper cables.
What does a jump starter do?
A jump starter is a device that is designed to allow you to jump-start your vehicle without requiring another vehicle. This is particularly handy, especially when there might not be another vehicle around to help jump-start your vehicle.
Whether your vehicle is old or new, a battery can suffer from a variety of issues, from leaving your headlights on to the age of the car battery or vehicle has been sitting for long periods of time. These can all be reasons as to why your vehicle will have difficulty starting.
Give it the kick it needs with a jump starter, and you will be back out on the road in no time. Bring your vehicle back to life with a portable, easy-to-use jump starter.
Jump starters offer a rapid burst of power to enable effective engine cranking; this will provide your vehicle with safe starting power.
Benefits of having a jump starter handy at all times:
- You can get your car started when your vehicle won’t turn over.
- It is small, portable, and easy to store away in your vehicle.
- Easy to use.
- Some come with USB ports making it easy to charge other devices you have.
- Some even come with a torch perfect for camping trips.
Step to using a jump starter on your vehicle
All you will need is a fully charged battery charger.

Step 1: Locate and check condition of battery
Before you do anything, you will need to check the condition of the battery and locate the battery. Usually, the battery is under the bonnet; however, sometimes, they can be located in other places like behind the seat or in the boot. Check your vehicle manual if you are unsure where your battery is located.
When checking the condition of the battery you will need to look for:
- Leakage of sulfuric acid
- Check for damaged terminals
- Loose terminals
If the battery looks like it is in really good condition, you can jumpstart your vehicle.

Step 2: Check manual for additional precautions
Before you begin to use the jump starter, check the manual of your car. It will tell you where to connect to the posts and any other additional precautions. This will differ between different cars.
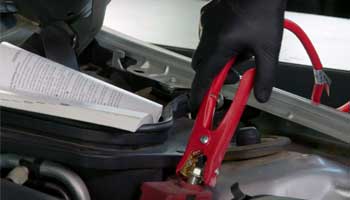
Step 3: Identify positive terminal and connect lead
You are now ready to connect the jump starter pack to your vehicle. Ensure you have the correct battery charger for your vehicle. Bigger is better when you do buy a battery charger; therefore, you can use the battery charger across your different vehicles. When you are at a Repco store, you can ask them what size you might need for your vehicle or alternatively check out this know-how article choosing the best battery jump starter for more information. When connecting the jump starter, always connect the red cable first. The red cable goes on the red terminal; however, you can also check where it goes by looking for the plus (+) symbol this could be located on the red plastic cover.
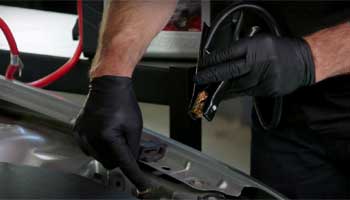
Step 4: Check manual and identify position for negative lead connection
Once you have connected the red cable, you can then proceed to connect the black cable to the vehicle. The position will be indicated in the vehicle manual; each vehicle will vary. It could be on the vehicle’s chassis, the negative terminal, or an earthing stud. Once connected the black cable make sure it has really good contact, wiggle it around a bit to get rid of any oxidization that might be there. You need to ensure this because there are going to be a lot of amps running down these leads.
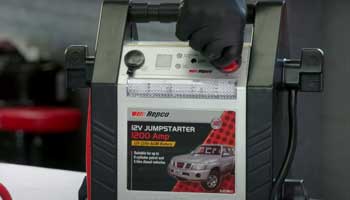
Step 5: Turn jump starter pack on and start your vehicle
Simply turn the jump starter on and then commence starting your vehicle as if you were going to go for a drive. How easy is this!
Tip:
If it takes more than six seconds to start, you need to wait for three minutes before you give it another go. Otherwise, you can cause permanent damage to the jump starter pack.
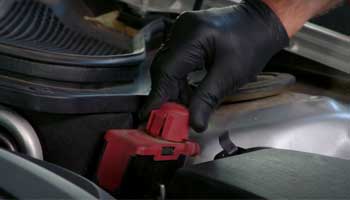
Step 6: Switch off the jump starter pack
Now that your vehicle is running, you are going to turn off the jump starter pack. Simply you are doing it in reverse to when you put the jump starter on. Switch the jump starter off, and remove the negative lead, which was the second lead you put on. Always best to remove the black cable first, then proceed to take the red cable off. Place the cables back on the holder on the jump starter pack for safe keeping. Place the cap back on the positive terminal and close the bonnet. You are now ready to get back out on the road.


